- Home
- Hardware
- SDKs
- Cloud
- Solutions
- Support
- Ecosystem
- Company
- Contact
news
Alexa-controlled Air Cooler with ESP8266
Reporting from Shanghai
Jun 23, 2020
You can easily hack your remote control with ESP8266! See how it works.
Ashok, the founder of Embedded Club, a community of makers in India, focused on embedded programming / design, STEM trainings, application development and 2D/3D animations, has come up with really cool project. He hacked the remote control of an air cooler, using ESP8266. More importantly, though, this project demonstrates that any infrared remote can be hacked in the same way.
Components
- 1× Any ESP8266 Board
- 1× Amazon Eco Dot
- 1× IR LED
- 1× OLED Display
The first step is to simulate the IR commands of the original remote control on a new microcontroller unit which can actually be any ESP8266 board.
You should then open the original IR remote and tap the IR signal to an analyzer, so that you can understand the code used for transmitting signals from the IR remote to the air cooler. In this particular project, the waveform captured by the analyzer showed the following parameters:
- Center Frequency: 38 Khz
- Modulation: Pulse Width
- Button Values (12bits)
-
- Power ON/OFF: 0xD81
- Fan ON/OFF: 0xD82
- Swing ON/OFF: 0xD84
- Cooling ON/OFF: 0xD88
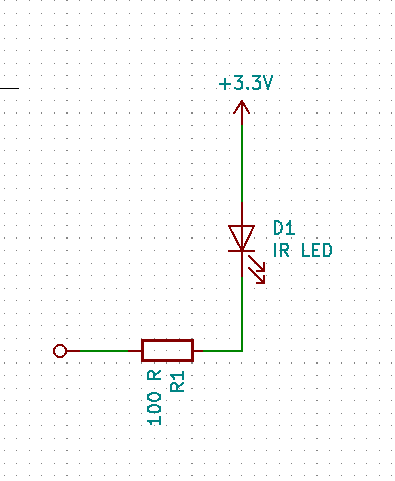
Based on these inputs, Ashok cloned the IR remote and turned his MCU into a new IR remote that he could control. He then connected P0_12 to the IR LED negative terminal with a 100R resistor. The IR LED positive terminal was connected to 3.3V.

Fig. 1: Connection Diagram
Subsequently, the new IR remote was tested in terms of controlling the air cooler and it worked properly.
Here is the Alexa Skills Setup
In this step, you need to create all the required commands directed at the air cooler, using the Amazon Alexa Developer Skills.
- Add INTENTS and the Invocation name to be used in the application.
- The end point should be set to the default skill code area.
- No lambda is required.
- HTTP requests can be handled in the code area.
Implementation
Finally the code can be implemented by using ESP8266 for reading and writing the HTTP requests to AWS (Amazon Web Services). In this specific implementation, Ashok used www.iotboxapp.com to direct his HTTP requests. He, then, added the OLED to the board with an I2C interface.

Fig.2: Implementation Diagram
Ashok’s project has been fully documented here, and you can view a demo video here.
Have you recently made any cool projects using Espressif SoCs? Let us know here, and we might choose yours to promote on our website!


 LinkedIn
 微信
微信
 Twitter
 Facebook
