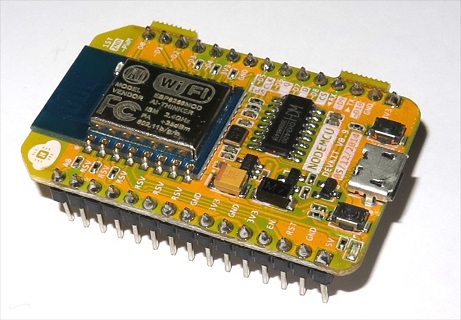
First you'll need an ESP8266
There is a variety of types to choose from, all of which should work; here, I’m using a NodeMCU-style board, which is easy to prototype, because it has USB support built-in for programming and powering the ESP8266.
Next, install the Arduino IDE
Get the Arduino IDE here. Using a recent version of the IDE – 1.6.4 or later – makes it easy to add the ESP8266 support to the IDE. With the Arduino IDE installed, use the Board Manager function to add support for the ESP8266, see here how to do that.
Add the MQTT PubSubClient library
The IBM Watson IoT Platform uses the MQTT protocol, so next add the MQTT PubSubClient library to the Arduino IDE. This needs to be a recent version of the library in order to work with the ESP8266. I’m using version 2.3 here.
Signup to Bluemix and the IBM Watson IoT Platform
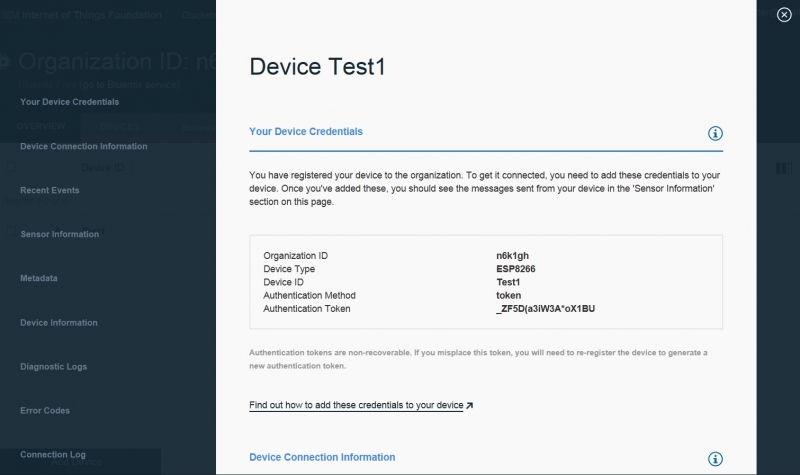
Next you need to sign up on the IBM Watson IoT Platform, and create an “organization” and a “device”. This is described in detail on the IBM website and involves signing up to Bluemix and the Internet of Things Foundation; in the Bluemix Catalog add an Internet of Things Service. This will create your Organization and then in the IoT Dashboard you can add a Device. There are lots of configuration options, nearly all can be left blank, you just need a device type (I used “ESP8266″), and a device ID (I used “Test1″).
When the device has been created you’ll see the Device Credentials page and you'll need to save those details which are used to customise your Arduino sketch in the next step.
The Arduino Sketch
Copy the following sketch to the Arduino IDE:
/**
 * Helloworld style, connect an ESP8266 to the IBM IoT Foundation
 *
 * Author: Ant Elder
 * License: Apache License v2
 */
#include <ESP8266WiFi.h>
#include <PubSubClient.h> // https://github.com/knolleary/pubsubclient/releases/tag/v2.3

//-------- Customise these values -----------
const char* ssid = "<yourSSID>";
const char* password = "<yourPassword>";

#define ORG "<yourOrganization>"
#define DEVICE_TYPE "ESP8266"
#define DEVICE_ID "Test1"
#define TOKEN "<yourToken>"
//-------- Customise the above values --------

char server[] = ORG ".messaging.internetofthings.ibmcloud.com";
char topic[] = "iot-2/evt/status/fmt/json";
char authMethod[] = "use-token-auth";
char token[] = TOKEN;
char clientId[] = "d:" ORG ":" DEVICE_TYPE ":" DEVICE_ID;

WiFiClient wifiClient;
PubSubClient client(server, 1883, callback, wifiClient);

void setup() {
 Serial.begin(115200);
 Serial.println();

 Serial.print("Connecting to ");
 Serial.print(ssid);
 WiFi.begin(ssid, password);
 while (WiFi.status() != WL_CONNECTED) {
 delay(500);
 Serial.print(".");
 }
 Serial.println("");

 Serial.print("WiFi connected, IP address: ");
 Serial.println(WiFi.localIP());
}

int counter = 0;

void loop() {

 if (!!!client.connected()) {
 Serial.print("Reconnecting client to ");
 Serial.println(server);
 while (!!!client.connect(clientId, authMethod, token)) {
 Serial.print(".");
 delay(500);
 }
 Serial.println();
 }

 String payload = "{"d":{"myName":"ESP8266.Test1","counter":";
 payload += counter;
 payload += "}}";

 Serial.print("Sending payload: ");
 Serial.println(payload);

 if (client.publish(topic, (char*) payload.c_str())) {
 Serial.println("Publish ok");
 } else {
 Serial.println("Publish failed");
 }

 ++counter;
 delay(10000);
}

void callback(char* topic, byte* payload, unsigned int length) {
 Serial.println("callback invoked");
}
Customise the lines after “//——– Customise these values ———–” with your WiFi network SSID and password and with the IoT Device Credentials from the previous step.
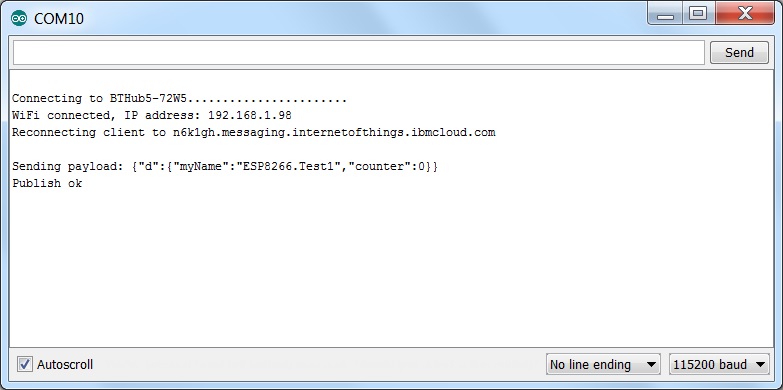
Upload and run the sketch
Upload the sketch to your ESP8266 and then open the Serial Monitor where you should see the values being published on the Watson IoT.
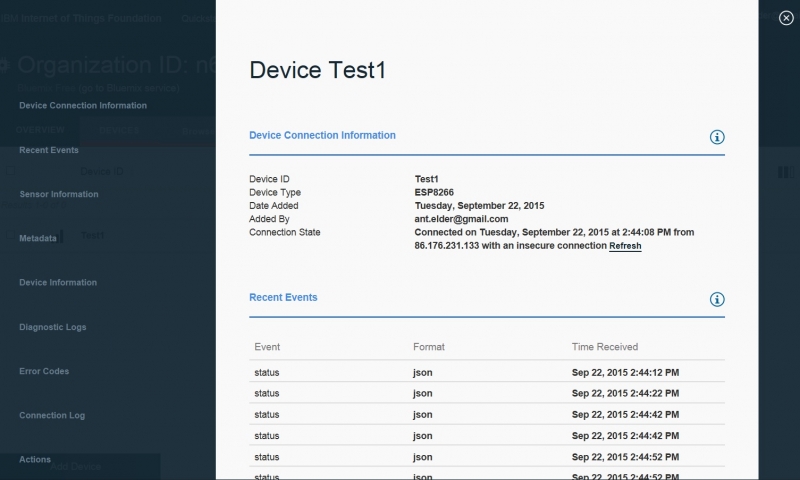
View the published data on the IBM Watson IoT Platform Dashboard
You can see the published events and data from your device on the Watson IoT Dashboard at this URL: https://<yourOrganization>.internetofthings.ibmcloud.com/dashboard/#/devices/browse
Thats it!
Hope you found this a useful introduction to using the ESP8266 with Arduino support and with the IBM Watson IoT Platform.
https://developer.ibm.com/recipes/tutorials/connect-an-esp8266-with-the-arduino-sdk-to-the-ibm-iot-foundation/
 LinkedIn
 微信
微信
 Twitter
 Facebook